


One of the really great things that Stampin' Up! has added to their product line is kits. I love kits because they help you get a specific task done quickly and without having to purchase a whole lot of stuff that you may never use again. Some kits come with everything included: stamps, ink, adhesives, etc.; other kits require the user to add stamps, ink, and adhesives. The kit I'm featuring today is one that I really enjoyed making: the Oh What Fun Tag Project Kit. With this kit, you make 30 Christmasgift tags; three each of 10 different designs. With this kit you will need to add the stamps, ink, and adhesives. Here are the 10 designs completed.

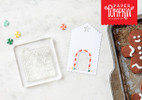
Aren't they cute??!! When I finished the tags, I realized that they would make adorable Christmas note cards. So I pulled out a set of Whisper White Note Cards & Envelopes and decided to put 10 of the tags on note cards. However, when I placed the tags on the Whisper White card front, I realized that with the amount of white on the tags, I would need to add a bit of color behind the tag, too. But that's just me. Why lose a chance to kick it up a notch? So for the next couple of blog posts, I'll be sharing with you the 10 tags made into cards. This post will have the first four (as you can see numbered in the photo above).

Tag #1: Since this tag had a jingle bell associated with it, I removed the jingle bell from the tag for the note card because you wouldn't be able to mail the card with the jingle bell. Bummer. I added a strip of Garden Green cardstock horizontally across the center of the card front with a narrow banner of Gold Glimmer Paper across the center of the Garden Green cardstock. Then I added the tag. I think before I mail this card I would snip the tag cord shorter to remove the knot, which would be problematic for the postal machine.

Tag #2: For this note card, I added a strip of Real Red cardstock vertically on the card front with a banner of Gold Glimmer paper running vertically through the Real Red cardstock. The tails of the banner were punched with the Triple Banner punch, but you could create them with Paper Snips, too. Then I added the tag at the center of the card front.

Tag #3: This note card features a panel of Silver Foil Sheets placed vertically on the card front with a banner of Real Red cardstock. The tails of the banner were punched with the Triple Banner punch, but you could create them with Paper Snips, too. Then the tag was added to the center of the card front. Like the first tag, I would snip the tag cord shorter to eliminate any problem with the postal machines.

Tag #4: Don't you just love the polka dots on this tag! For the note card, I place a panel of Real Red cardstock vertically on the card front and adhered the tag.
You may have noticed that I mention shortening the tags with the thick red cord to remove the knots and some of the droop prior to mailing the note cards. This is to make things easier for the card to travel through the postal machines without being torn apart. The knot on a thick cord would be the same as having a pearl or rhinestone on the card. For the tags using Baker's Twine, I'll leave them alone because the knots are very small and would not pose an issue with the postal machines. Of course, if you want to leave the thick cords intact, you would need to provide some padding over the card front to ease the bump of the knot through the postal machine or pay extra postage to have the note card hand cancelled.
Mickey sure provided us with some great ideas for tags and cards. Christmas will be here before we know it, so lets get started on things we can do ahead of time!
Love,

Bev Farmer, SU Demonstrator
Website/Store: www.bevscards.stampinup.net
Email: Inthedell3@zoominternet.net
Blog: www.createwithbev.blogspot.com


